


Accurate shower door measurement starts with the finished opening-not the nominal size printed on a shower base or an early construction drawing. Wall finishes, threshold position, wall plumb, door operation, and the selected hardware system all affect whether a door will certainly fit and run properly.
This guide discusses just how to measure for a shower door in seven functional actions. It applies to usual sliding, hinged, frameless, inline, corner, and bathtub configurations. For custom glass or facility designs, the final dimensions ought still be verified against the chosen product's technological needs prior to production.
|
Mesa's Five-Point Measurement Check
|
When Should You Measure?
Take last order measurements only after the shower area is in its finished condition. The shower pan or bathtub should be fixed in possition, and all tile, grout, wall panels, trims, benches, knee walls, and ledges need to be completed.
Measurements taken before these surfaces are mounted are suitable for planning only. Backer board, adhesive, tile, wall panels, and trims reduce the finished opening and may change the glass installation line. In a restoration, eliminate the existing door or frame when practical so the ended up opening is totally accessible.
Tools You Need
-
Rigid tape measure
- Spirit level
- Pencil and notepad or measurement form
- Straightedge
- Graph paper for a simple layout sketch
- Protractor for angled or neo-angle layouts
- Phone or camera for site photos
Use a tape measure for the last readings since it is easier to position on the exact threshold and glass line. When dealing with a worldwide supplier, document both inches and millimeters. Keep the original readings and do not round them unless the product instructions specify a needed format.
Step 1: Identify the Door Type and Layout
Before measuring, identify the intended configuration: sliding or bypass, hinged or pivot, frameless, inline with a fixed panel, 90-degree corner, neo-angle, tub door, or fixed screen.
Stand outside the shower and draw a simple plan. Mark the left and right walls, door position, fixed or return panels, hinges, handles, and opening direction. Label the sketch "viewed from outside the shower" to stop left-hand and right-hand configurations from being reversed.
Step 2: Measure the Finished Opening Width
For a straight wall-to-wall opening, gauge the width at 3 positions:
- Bottom: near to the threshold or tub deck
- Middle: around halfway up the planned glass height
- Top: at the designated top of the door or unit
Maintain the tape degree and document all three values. The tiniest reading determines the tightest factor and can assist figure out whether a flexible typical door may fit, but it should not automatically be utilized as the last customized glass size. The manufacturer may require every analysis to calculate deductions, wall-profile modification, fillers, or designed glass.
Examine the actual setup range of the selected product. A door called "60 inch" may be designed for a narrower variety; the item name is not a replacement for the technical specification.
Step 3: Measure the Height
Measure up and down from the top of the ended up limit, shower curb, bathtub deck, or completed flooring to the prepared top of the glass. For wall-to-wall or floor-to-ceiling units, record the height at the left, center, and right.
If the readings vary, note the real variation as opposed to balancing it. The selected system's installation guide should establish the final glass height and any required clearance for training, placing, or protecting the panels.
Step 4: Check Wall Plumb and Threshold Level
Area a level up and down against each ended up wall surface at the designated glass placement. Videotape the quantity and instructions of any kind of lean-- for instance, whether the wall relocates into or away from the shower as it rises. "Wall surface is uneven" is not precise sufficient for a supplier to review the opening.
After that position the level throughout the limit or bathtub deck. Tape any incline or height difference. Frameless systems are particularly sensitive to these conditions since there is less framing available to hide or make up for irregularities. Change ability is product-specific, so never apply one manufacturer's resistance to another system.
Step 5: Measure the Threshold and Glass Centerline
Step the threshold from front to back and determine the functional flat placing location. Document:.Step
- Total threshold depth
- Minimum usable flat depth
- Direction of the inward slope
- Intended glass centerline
- Distance from the centerline to the front and rear edges
Do not think the promoted size of the shower base equals the unit size. Base dimensions usually define the outside footprint, while the glass is set up further inward on the useful aesthetic. This difference is specifically essential for corner and neo-angle bases.
Step 6: Confirm Door Operation and Clearance
For a hinged or pivot door, measure the clear area in front of the opening and check for toilets, vanities, towel rails, radiators, cabinet handles, walls, or another bathroom door. Mark the hinge side and opening instructions as viewed from outside the shower.
For a sliding door, verify the overall opening width, functional track area, panel activity, and overlap required by the selected design. Do not figure out the last door-leaf size alone; glass thickness, hardware, panel weight, hinge ability, and clear access size need to be considered with each other.
Step 7: Measure Special Layouts
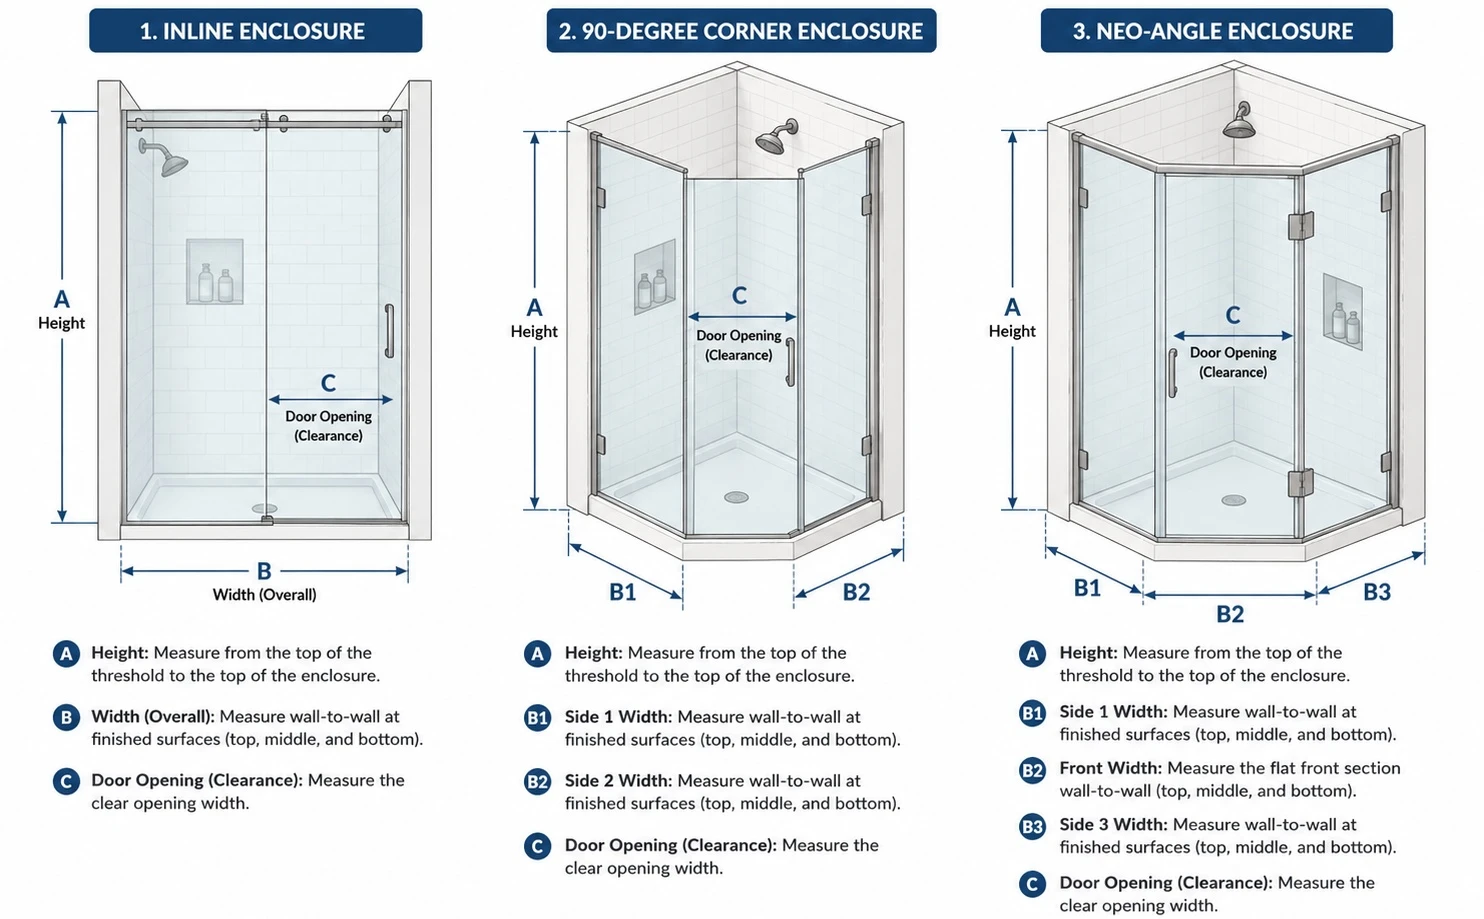
Inline enclosure
Measure the complete wall-to-wall opening at multiple heights. On the sketch, identify the intended door and fixed-panel positions and mark the hinge side.
90-degree corner enclosure
Mark the glass centerline on both thresholds. Measure from each finished wall to the point where the two centerlines intersect. Submit the two dimensions separately rather than combining them into one total.
Neo-angle enclosure
Record the left return, door section, right return, and the angle between each section. Also provide the finished height, wall-plumb readings, threshold level, and a clearly labeled plan.
Knee walls, benches, and ledges
Measure the width, height, depth, and slope of every surface that will meet the glass. Include close-up photos and a sketch. These layouts should normally be verified before custom glass fabrication.
Shower Door Measurement Record
Use the table below to keep the original readings in one place.
|
Measurement |
Location |
Result |
|
Opening width |
Bottom |
________________ |
|
Opening width |
Middle |
________________ |
|
Opening width |
Top |
________________ |
|
Finished height |
Left |
________________ |
|
Finished height |
Center |
________________ |
|
Finished height |
Right |
________________ |
|
Threshold |
Usable flat depth |
________________ |
|
Left wall |
Plumb variation |
________________ |
|
Right wall |
Plumb variation |
________________ |
|
Threshold |
Level variation |
________________ |
|
Door operation |
Slide / hinge / pivot |
________________ |
|
Opening side |
Left / right |
________________ |
|
Glass centerline |
Marked / not marked |
________________ |
Measure each critical dimension twice. For custom projects, an independent second check is recommended before the order is released.
Common Measuring Mistakes
Measuring before tile, wall panels, or the shower base are finished.
- Taking only one width or height reading.
- Rounding or averaging dimensions before recording the raw values.
- Using the base's nominal outside size instead of the actual glass line.
- Ignoring wall plumb, threshold level, or usable mounting depth.
- Forgetting door-swing clearance or sliding-panel movement.
- Ordering from a nominal product name without checking its installation range.
- Submitting dimensions without a labeled sketch and clear site photos.
What to Send a Shower Door Supplier
For a standard inquiry, send the measurement record, door type, opening direction, labeled sketch, and clear photos of the entire opening. For distributor, contractor, wholesale, or project requirements, also include:
- Project country or target market
- Required quantity and preferred configuration
- Glass thickness and hardware finish
- Standard or custom size requirements
- Shower base or wall-system information
- Packaging, documentation, and certification requirements
- Target project schedule
Complete information allows the supplier to assess product fit, adjustment range, configuration, and project requirements before preparing a recommendation. Mesa's B2B process prioritizes confirming the key dimensions and specifications first, then matching the inquiry with a practical product or project solution.
When Professional Measurement Is Recommended
Use professional verification for custom frameless glass, angled or curved layouts, floor-to-ceiling enclosures, severely uneven walls, large hinged panels, knee walls, unclear structural support, or repeated units for hotel and apartment projects. Because tempered glass is produced to final dimensions before tempering, it cannot normally be trimmed or drilled on site to correct an ordering error.
Final Order Check
-
All finished surfaces and the shower base are complete.
- Width and height readings were taken at multiple positions.
- Wall plumb, threshold level, and usable depth were recorded.
- The glass centerline and door operation were confirmed.
- Nearby obstructions were checked.
- A labeled sketch and site photos are ready.
- The selected product's installation range was reviewed.
- All critical dimensions were checked twice.
Accurate measurement is not about finding one "standard" shower door size. It is about matching the finished opening, installation line, hardware system, and operating conditions to the selected product.
|
Need help matching a shower door to your opening or project? Explore Mesa shower door solutions or contact our team with your opening dimensions, layout, quantity, target market, and hardware requirements.
|
FAQ
1. Should measurements be taken before or after tiling?
Take final measurements after the tile, grout, wall panels, shower base, and threshold are complete. Earlier measurements are suitable only for planning.
2. Where should the opening width be measured?
Measure the finished wall-to-wall opening at the bottom, middle, and intended top of the door. Keep all three readings.
3. Should the minimum width be used for ordering?
The smallest reading shows the tightest point, but it should not automatically become the final glass size. Compare all readings with the selected product's installation requirements.
4. What's different about measuring frameless doors?
Frameless systems require careful wall-plumb, threshold-level, centerline, hinge-side, and door-clearance information because there is less framing to accommodate irregularities.
5. Is the shower base size the same as the door size?
Not necessarily. The base size may describe its outside footprint, while the glass is installed on an inward centerline. Measure the actual finished installation line.