


What are shower stalls?
Complete Guide About Shower Stall: Installing A Shower Stall, Step By Step
What are shower stalls?
A bathroom shower stall is significant for a small house. Today, the bathroom shower stall is getting popular. A shower stall is a closed area that can contain splashes and streams of water within a defined space during the showering process. However, there are examples of different types of outdoor shower rooms, from beaches to lakeside cabins.
A simple shower stall contains an opening in one of the structure's four defined walls, roof, and walls. In addition to the basic design of the shower enclosure, many other features can be included. For example, shower nozzles can be mounted on each of the four walls at different heights. Brick and tile-covered masonry can be used to build walls and floors, and fiberglass doors can facilitate access to the stables.
For outdoor use, the simple and rustic design of the overhead shower head, combined with four walls of treated and sealed wooden panels, provides privacy while admiring views of nearby lakes and wooded areas. You can secure enough.
")
The wide range of shower and cabin types makes it possible for everyone to find the right one. Simple fiberglass cabins are suitable for tight spaces, but larger and more elaborate cabins can be incorporated into new home designs or remodeling existing bathrooms. Outdoor huts are an excellent option for warm climates and are relatively easy to build from simple materials. The tools and materials needed to create or install a shower enclosure are available at most hardware stores.
How to Install a Shower Stall
Many homeowners choose to install a shower room as a functional alternative to a full bath. Plumbing and carpentry skills are required to install the shower room successfully. Always follow the manufacturer's instructions and seek expert advice as needed. If you are renovating a bathroom or planning a new addition to your home and are ready to install a shower room, there are a few steps you need to follow.
Planning and organizing
1. Determine the ideal location.
Whether installing a shower room to save space in your new bathroom or replacing the tub, the shower room should be close to the hot and cold water lines and have access to the drains.
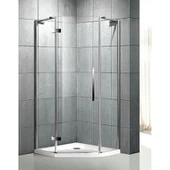
2. Determines the type of stall.
A simple search from the internet or a stroll through the plumbing shelves in hardware stores reveals the different types of shower rooms on the market. We offer a wide range of options, including a bench to sit in the cabin, rectangular to semi-circular shapes, and sizes to suit all your needs. However, there are some specific strains, and their differences can affect the installation process.
● One Piece ready-made showers are complete units usually made of GRP or acrylic. Some argue that they tend to be more expensive than other shower room sets and are more challenging to install. As you can imagine, the entire unit is a bit bulky and can be challenging to get through doorways and stairs. On the bright side, they tend to be well built and easy to clean.
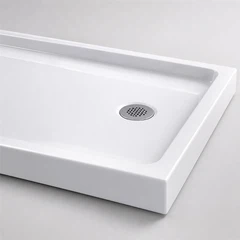
● Interlocking multi-piece units are usually provided in 4-6 large pieces, including a shower tray (floor area that stands in the shower and connects to the drain) and wall panels (for the sides). The unit is mounted along the bathroom wall), side panels (not located along the bathroom wall), and doors. Many of these kits are considered easy to assemble and are generally much cheaper than one-piece units.
")
3. Buy materials
There is an extensive list of resources you need to get to complete this project. Here is a partial list.
● Plumbing pipes and accessories. Not only do you need to ensure you have enough pipes, but you also need to procure the right parts to allow new pipes to be connected to existing pipes.
● Shower unit/kit.
● Waterproof caulking/sealant. It's probably best to buy a silicone-based caulk or caulk known for its water resistance.
● Tools such as wrenches and screwdrivers.
4. Read the instructions that come with the shower unit or kit.
Some provide little detail, but most include instructions explaining how the shower fits in. Even those who don't directly explain the processes you need to follow will certainly suggest what the prerequisites for the installation are.
Shower installation
1. Clean and prepare the designated shower area.
It may be desirable to remove bathroom tiles and other floor coverings and install the shower directly . It would be helpful if you also located the appropriate drain, measured the shower tray to locate it, and punctured the floor.
● If the pipe runs through the wall, for example, the pipe is not an exposed basement, you need to tear the section of the wall. This should be one of your first steps.
2. Create a frame to support the stand (if applicable).
")
For some shower kits, building a structure that supports the shower tray or reinforces the entire prefab unit is necessary. In many cases, the unit needs to be bolted, so the necessary structure must be built to make this possible.
● After installing the shower room, some units need to complete at least part of the building of the frame. Please read the instructions carefully.
● Some multi-piece shower sets come with a frame that holds the sides. Before installing, check the instructions that came with the kit to determine how the shower room fits in the bathroom.
3. Install the shower tray / finished product.
Slide the pan or unit into place and screw it in place.
4. Install the plumbing (if not already installed).
For some installations, this may be the first task you need. For others, it should be the last. Perform the following steps:
● Please stop the main water supply.
● Wire the hot and cold pipes to match the holes in the shower faucet handle using traditional plumbing methods. Use sealing tape and a pipe wrench to attach the extension pipe with screws suitable for the shower head. Install the faucet handle and shower head. You can now open the water supply while checking the leaks.
● Connect the drainage line. Secure the drain pipe with the kit (included with the unit or sold separately). The drain should be sealed with plumbing putty and tightened to prevent leaks. (See the guides here and here for more information on installing bathrooms.)
5. Install the side of the shower room (if applicable).
A multi-piece shower set requires this step, but it can be delayed until the project is almost complete. If you dislike to work in a small shower room, choose to save this step last.
● Some kits require screwing on the wall-mounted side, while others recommend using rugged caulking. Remember when purchasing a sealant, as some can also be used as an adhesive.
6. Close the project.
Cover the exposed frame with waterproof drywall and seal the water-exposed seams with silicone-based caulking. Textures and colors as needed. Secure the shower door or curtain.